How to Setup a MongoDB Cluster

MongoDB is a NoSQL non-relational extensive data database management system used by several web applications to store data. It is classified as a comprehensive database because it is easily scalable by adding more resources to a server (vertical scaling) or adding more servers (horizontal scaling) to a distributed system.
MongoDB stores data as JSON-like documents with dynamic schemas. Each MongoDB database includes collections of different documents, and each collection and document has a unique ObjectID supplied by MongoDB or created by the programmer. As a result, MongoDB does away with the fixed schemas and tables used in relational database management systems.
MongoDB may duplicate data, but it delivers faster speed, allowing users to access data. It is available in the community (free to use), enterprise (paid plans), and Atlas (cloud) versions. The MongoDB Atlas is a cloud-based service that allows developers to build modern applications. Developers can deploy managed cloud databases across multiple public cloud platforms.
How to Install MongoDB
You can install MongoDB on Windows, Mac OS, or Ubuntu. Because MongoDB uses up a lot of RAM, you’re better off running MongoDB on Ubuntu or Mac OS. The Windows operating system may compete with RAM and therefore slow down the application.
In this tutorial, we’re going to look at how to install MongoDB on Ubuntu 20.04.
MongoDB Installation on Ubuntu 20.04
To install MongoDB on Ubuntu 20.04, you must have an Ubuntu 20.04 server with a non-root administrative user and a UFW-configured firewall. You can quickly obtain MongoDB from Ubuntu’s official package repositories. However, this repository may contain an outdated version. To ensure you get the latest version of MongoDB, you must include MongoDB’s dedicated package repository in your APT sources. This will enable you to install MongoDB-org, a package that directs to the latest MongoDB version.
MongoDB 5.0 is the latest version, with exciting new features like time-series collections, new aggregation operators such as $dateAdd, $dateSubtract, and $getField, and many more. To start we’ll begin by updating the APT package index and installing the dependencies using the following command line:
sudo apt update

sudo apt install wget curl gnupg2 software-properties-common apt-transport-https ca-certificates lsb-release
Download and import the public GPG key for the latest MongoDB release using the following command:
wget -qO - https://www.mongodb.org/static/pgp/server-5.0.asc | sudo apt-key add -Alternatively, use:
curl -fsSL https://www.mongodb.org/static/pgp/server-5.0.asc|sudo gpg --dearmor -o /etc/apt/trusted.gpg.d/mongodb.gpgThis command will return OK if the key was added successfully.
Next, you have to add the MongoDB repository through the following code:
echo "deb [ arch=amd64,arm64 ] https://repo.mongodb.org/apt/ubuntu $( lsb_release -cs)/mongodb-org/5.0 multiverse" | sudo tee /etc/apt/sources.list.d/mongodb-org-5.0.listAfter running this command, the next step is to install the MongoDB update packages.
sudo apt update sudo apt install mongodb-orgPress the ‘Y’ and ‘ENTER’ keys to accept the installation prompt. This will install MongoDB on your system. However, it is not ready for use just yet. You have to startup Mongo through the following command:
sudo systemctl start mongod.serviceCheck MongoDB status to ensure that it is running
sudo systemctl status mongodThe output will be something like this:

Afterward, enable MongoDb to startup at boot through the following command:
sudo systemctl enable mongodWhen you’re done, you can configure security, enable remote access, create Users and Databases, assign admin roles to users, etc. You can also tune MongoDB to ensure optimum performance at all times.
Now that you’ve installed MongoDB, we’ll take a look at how to configure a MongoDB cluster.
What is a MongoDB Cluster?
A cluster refers to a collection of MongoDB servers working together. A MongoDB cluster can refer to a “replica set” or a “sharded cluster.”
Several servers carry a copy of the same data in a replica set. A replica set typically consists of three nodes. One primary node receives all read and write operations from the client application, and two secondary nodes protect against failure.
If the primary node fails, MongoDB automatically assigns a secondary node to replace it, becoming the new primary node responsible for reading and writing operations. Replica sets guarantee high availability since the same dataset is always available.
Several servers in a sharded cluster carry a fragment of the whole data, allowing for more efficient performance and greater data storage. Basically, a sharded cluster is a collection of replica sets; each called a shard. When a client application performs a read/write operation, the request passes through a router that validates which shard holds the required data. The request is then sent to the shard.
Traditionally, MongoDB clusters are referred to as sharded clusters but are now used for both configurations. Sharded cluster architecture allows for easy horizontal scalability.
MongoDB cluster setup
Here, we’ll look at setting up a sharded MongoDB cluster. The sharded architecture looks like this:
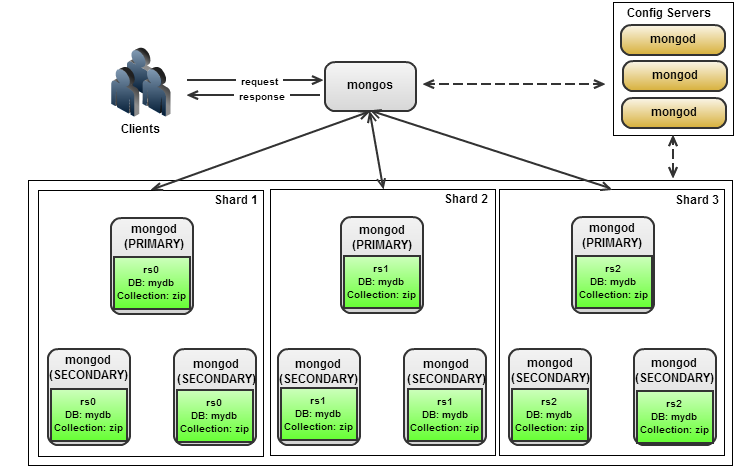
The Shard cluster architecture consists of three components.
- Shard server: The shard is a database server that consists of different replica sets that each hold a portion of your data. Each replica set or shard is responsible for some indexed value in your database.
- Query router (mongos): Mongos is a process running on the client application communicating with MongoDB. Because the data is distributed between different shards, the query must be routed to the shard that holds the requested data. It is standard practice to have different query routers for each application server.
- Config server: The configuration server stores metadata for the shards. Mongos communicates with the config server to figure out which replica sets to query for data. Typically, the configuration servers must consist of at least three servers. They have no failover capability; if one server fails, your whole process goes offline.
Setting up a MongoDB cluster requires that you run each of these components as separate processes.
Cluster Setup Procedure
You will need a different system to set up each component in a production environment. However, we will set all processes on a single server for this purpose.
Step 1: Create folders to represent the shards and config servers.
The first step is to create different folders. First, create three config folders for the config servers, then three shard folders for the individual replica sets. The code will look something like this:
mkdir cfg0 cfg1 cfg2

mkdir a0 a1 a2 b0 b1 b2 c0 c1 c2 d0 d1 d2
(each letter represents a different shard)
When you enter this, you will get a query cursor; enter Is-1 to complete the folder setup.
Step 2: Start the config servers
Use the following command:
mongod -- configsvr --dbpath --cfg0 --port 26050 --fork --logpath log.cfg0 --replSet cfgSince we run every process on the same server, it’s important to specify a different port for the MongoDB instances. After setting up the first config server, you will enter a similar code for the remaining config servers, changing the port, dbpath, and logpath in each instance.
After all, the configuration servers have started, log into the first server on port 26050:
mongo --port 26050Then initiate replication for the server using:
rs.initiateThen add the remaining config servers in the replication using:
> rs.add("localhost:26051")

> rs.add("localhost:26052")
We used consecutive port addresses for the different servers. You can check the status of your config servers in the mongo shell using;
> rs.status()You will see all the three servers added with id, name, health, state, etc. Then, exit the config severe using:
cfg:PRIMARY> exitStep 3: Initiate Shards
Initiate the first shard instance using the following command:
mongod -- shardsvr --replSet a --dbpath a --port 26000 --fork --logpath log.a0Afterward, start other instances in the replica set on a different port with the right logpath and dbpath. Repeat the similar process for the other shards.
When all the instances are up and running, start the shard and initiate shardsvr replication.
First, log into the a0 instance, then initiate replication:
mongo --port 26000

> rs.initiate()
Then add the other two servers:
a:SECONDARY> rs.add(:localhost:26001)

a:SECONDARY> rs.add(:localhost:26002)
Repeat the same procedure for the b0, c0, and d0 instances, and add the replica sets.
Step 4: Start the Mongos instance.
The next step is to start the mongos. Mongo serves as an interface between the client and the sharded environment. Start the mongos instance through the following line:
mongos --configdb "cfg/localhost:26050,localhost:26051,localhost:26052" --fork --logpath log.mongos1 --port 26500.We can run multiple mongos instances to increase the availability of mongos to the client. This will be set up using a similar command but changing the logpath and port:
mongos --configdb "cfg/localhost:26050,localhost:26051,localhost:26052" --fork --logpath log.mongos2 --port 26501.Next, log into the mongos instance:
mongos --port 26500From this mongos instance, you can add the different replica set instances (a, b, c, d) as shards using the command:
mongos> sh.addShard("a/localhost:26000")Then add the replica set using the same code, but imputing the primary port for set b, then c, and d.
To check the status of your sharded environment, you can run the command:
mongos> sh.status()It will show you the different shards a, b, c, and d and the replica sets within each.
Adding Databases and Collections to Shards
mongos> show dbsShows you the available databases, including the config, mydb, and admin database. The result may look like this:
admin 0.000GB
config 0.002GB
mydb 0.000GB
To shard any of these databases. For example, to shard the mydb database, you enter the code:
mongos> sh.enableSharding("mydb")This command will add admin to the sharded databases, and you can see that when you enter sh.status().
After you have sharded the database, you can enable sharding for the collections. The second parameter (_id:1) defines the shard key you want to keep for the collection.
mongos> show collections
product
sales
mongos> sh.shardCollection(“mydb.saled”), (_id:1)
When you run sh.status, you’ll see something like this
mydb.sales
shard key: {“_id” : 1}
unique: false
balancing: true
chunks:
d 1
{ “_id” : { “$minkey” : 1}} –>> { “_id” : { “$minkey” : 1}} on : d Timestamp(1, 0)
The value chunks show the partition of data into chunks. From the above, we see that the data only resides on the shard d because it is minimal. However, as the data grows, it will be divided into chunks and placed into different shards.
Conclusion
Here, we have looked at how to set up a MongoDB cluster on a single server. In a production cluster, each shard will reside on a different machine, and the config server and mongos will also reside on other machines.
To learn more about server cluster hosting and database hosting, contact us at ServerMania, and we’ll help you select the appropriate systems for your application.
Was this page helpful?
About the author

