How to Install OpenStack to Manage Your Server Cluster

Data optimization is a vital concern of any industry looking to improve. Server clustering provides redundancy and scalability, providing an efficient solution to this concern.
A server cluster introduces redundancy and automatic failover that protects from outages. Server cluster hosting ensures that an error in one server does not shut down your entire network. Instead, functionalities are immediately shifted to other servers in the cluster.
Server clustering is not limited to physical servers, as you can cluster your cloud servers. When running a clustered cloud server, you need a resource to manage your clusters, including adding and removing nodes efficiently. You can achieve this through OpenStack.
What is OpenStack?
OpenStack is an open-source platform utilized for building and managing cloud platforms for public and private clouds by using pooled virtual resources. OpenStack is a standard cloud computing platform deployed as an infrastructure service (IAAS) in public and private cloud environments where all the resources are made available to the user.
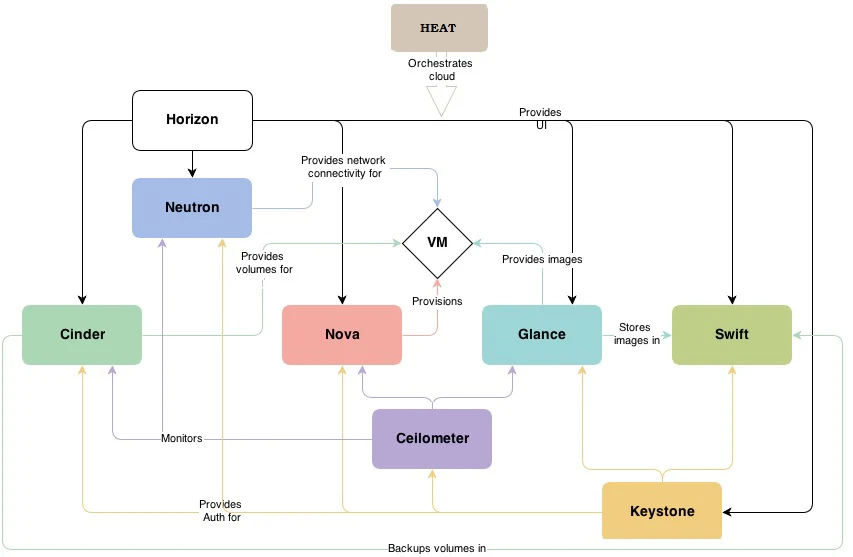
Components of OpenStack
There are nine core components in OpenStack.
- Nova: Nova is the primary computing engine behind OpenStack. Nova is used for deploying and managing many virtual machines and other instances needed to address the computing task.
- Glance: Glance is a component that provides the imaging service to OpenStack. There are images contained in the virtual copies of a hard disk. Glance allows these images to be used as the template when installing new virtual machine instances.
- Swift: Swift is an object storage system storing objects and files.
- Cinder: Cinder is a component used for block storage. Cinder can locate specific locations on a disk drive.
- Keystone: Keystone operates the identity services for OpenStack. This component provides all authentication mechanisms.
- Neutron: Neutron provides the networking capability for OpenStack. Neutron helps to ensure that each OpenStack component can communicate with the others quickly and efficiently.
- Ceilometer: The ceilometer is a telemetry system that collects data regarding the usage of the OpenStack components. The output data can be used for billing individual users of the OpenStack services.
- Heat: This is the orchestration component of OpenStack. It allows developers to store the requirements of every cloud application in a file that defines what resources are required and what conditions are necessary to run the application.
- Horizon: Horizon is the OpenStack dashboard. It is a GUI that helps every user see which OpenStack components are running. It also allows developers to monitor the OpenStack environment and define which components need to be managed.
OpenStack Installation
OpenStack requires operating systems that support virtualization in the back-end as it cannot be installed on hardware directly. Ubuntu(KVM), Redhat Enterprise Linux(KVM), Oracle Linux(Xen), Oracle Solaris(zones), Microsoft Hyper-v, and VMware ESXi are operating systems that support the OpenStack cloud platform.
Before installing OpenStack, ensure you install Ubuntu 18.04 on VMware and then enable virtualization. OpenStack requires large RAM allocation. So ensure you have between 5 and 6 GB of RAM available.
Step 1: Retrieve Installed Packages and Check Required Updates.
The first step is to retrieve the packages already installed on the system and check for required updates. Use the below command to achieve this:
> sudo apt-get update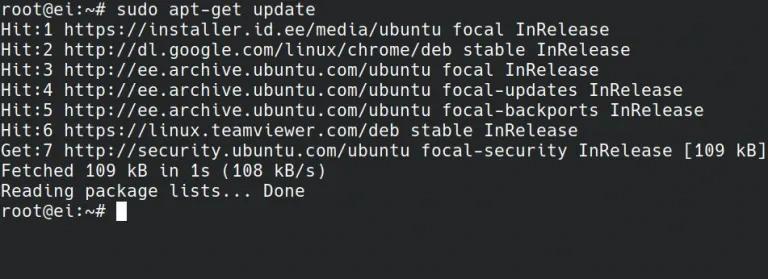
Step 2: Install Available Upgrade of All Packages
Achieved through the following code:
> sudo apt-get upgradeThe above command line installs all the available upgrades of all packages currently installed on the system from the sources configured by the list file. If required, the new packages will be installed to satisfy the dependencies. However, existing packages will not be removed.
This step takes about 3-5 minutes to complete.
Step 3: Install Git
After installing all upgrades, the next step is to install git. The command line for this is:
> sudo apt-get install git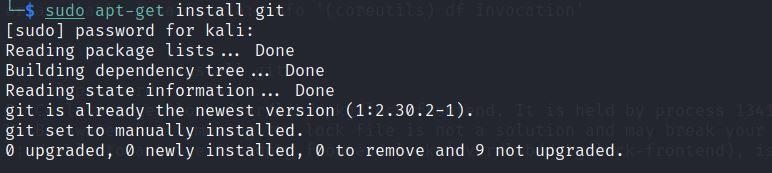
Git is an open-source distributed version control system that manages changes to source code and documentation in OpenStack.
Step 4: Use Git to Clone Devstack’s git repository
After installing git, you will use a git clone command to copy the devstack git repository for installing the packages on the OpenStack cloud. This will require the following command line:
> git clone https://opendev.org/openstack/devstack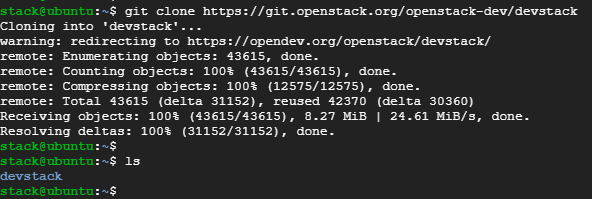
This command will clone the devstack git repository into a devstack folder. The devstack repository contains the script that installs Openstack and other templates required for its configuration.
Step 5: Access Devstack Folder and Make Changes to Inc Python File
Without making specific changes to the inc python file in the devstack folder, you will likely encounter errors while installing the OpenStack clone. This error occurs because of the pip install command. Type in:
> cd devstack/locates the devstack folder
-/devstack$ gedit inc/pythonLocate the following line when you enter the window
$cmd_pip $upgrade \then change it to
$cmd_pip $upgrade $install_test_reqs --ignore-installed \Save and close the folder.
Adding this command will help avoid any error messages when installing Openstack.
Next, locate the samples folder through the command:
> cd samplesin the samples folder, you are going to copy the local conf file via the following code;
-/devstack/samples$ cp local.conf ../

-/devstack/samples$ cd ..

-/devstack$ local.conf
this takes you to the local conf file where you will make several changes, including;
- your admin password
- database password and rabbit password
- Host IP and add floating range
After making the changes, save the file and close the page.
Step 6: Start Installing OpenStack Cloud
Use the below command to install OpenStack
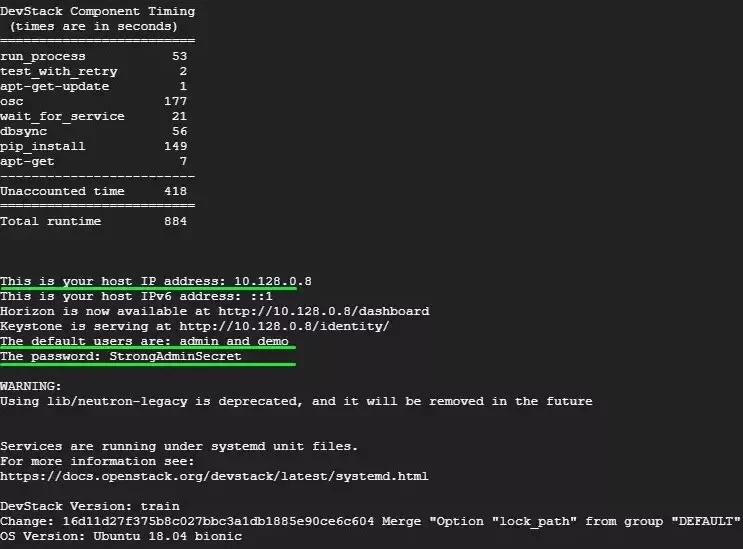
/devstack$ ./stack.shCloud installation will take between 30 and 40 minutes to complete depending on your internet speed.
Once the OpenStack installation is completed, you should get a screen like the image below.
Step 7: Accessing OpenStack via Browser
Using the horizon address, you can access OpenStack through your web browser. On the OpenStack login page, enter your username and password. You will be directed to the management console dashboard.
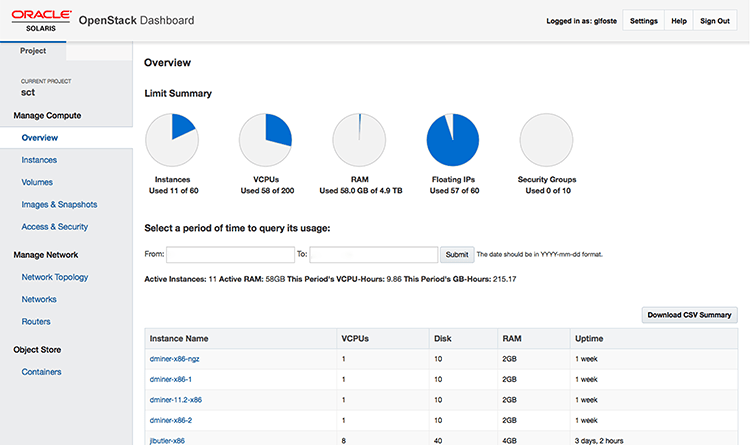
You can easily add clusters from this dashboard to increase processing capability, customize your clusters, or remove clusters from your OpenStack deployment.
To learn more about server cluster hosting and dedicated servers, book a free consultation, and we’ll help you select the appropriate systems for your application.
Was this page helpful?
About the author